
Hi, my name is Andrey and I’m a Photoshop addict.
Photoshop
It’s been my weapon of choice for 12 years, but why not to have two guns in your holsters instead of one? Adobe has plenty of tools in the box and it’s up to you to decide which one is the right to do the job. And it’s better to choose the proper one, not the familiar one. Yes, you can still make some not-so-complicated print stuff in Photoshop, but InDesign suits is better for it. You can create vector graphics in it, but Illustrator is more powerful. As I have mostly created UI design for the last few years now I’m feeling like a roofer that uses a carpenters hammer completely ignoring the existence of a nail gun.
Fireworks
Fireworks was created for web design as it’s always been, but now it requires less effort to switch to it from Photoshop and it became more stable as it never was. I’ve tried it previously when it was a Macromedia product and it struck me as very flimsy and almost unusable comparing to Photoshop. I never dug deep enough in it then, but the first impression was: “Why the hell this thing exists and who is using it anyway? Flash — cool, Freehand (RIP) — awesome, but what is Fireworks for when you can use Photoshop?”. Now the answer is clear — if you are doing a lot of wireframing, have more than, say, 3 pages in your project and going to iterate back and forth for dozens of times (we are all hoping to have a home run from the first try, but let’s face the facts) it’s the right tool for you.
No one left behind
“But what about my beloved Photoshop?”, you ask. Should I stop using it? One thought about giving up my old friend makes me cry! Well, you shouldn’t. No withdrawal is coming, my fellow addicts — you can have your Photoshop fix whenever you want and use Fireworks right after or vice-versa if you are doing everything right.
So, what’s next?
In the next few paragraphs I’m going to show you not how to switch to Fireworks, but add this tool to your arsenal and enhance your design firepower by holding it next to Photoshop in the other hand. There are quite a few articles around comparing PS and FW (1, 2, 3, 4, 5) and I’ll try not to write another one and just focus on practical hints of PS to FW transition assuming that you’ve already made your choice and decided to try Fireworks without saying farewell to Photoshop.
Setting up
I’m going to use Photoshop CS4 and Fireworks CS5 and hope there will be no significant differences if you are using other versions. Also, my way around PS could be different from yours, so please don’t take any of my advise as immediate call to action, be flexible.
Concept
What I’m trying to do here is to get most of our PS experience to FW. Since we are not switching to FW completely — I’d recommend you not to use FW features full throttle yet, at least not all of them. And to keep the balance — same goes for PS. We’ll try to avoid using some specific stuff in both applications to make our files reasonably compatible and switching back and forth as easy as possible.
OK, a little less conversation, a little more action.
Preferences
The one and only thing I recommend adjusting there for now is to turn mouse highlight off in Edit section of FW (it will show you object boundaries when you mouse over). It’s the first thing that will make FW interface feel alien to you comparing to PS and we don’t want that, do we?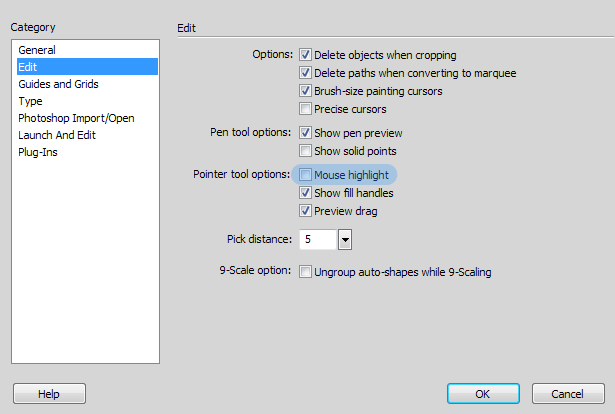
I guess It could be handy while exploring a file of your colleague’s creation to overview the structure, but you should well know what is where in your own, so it looks a bit excessive to me.
Keyboard shortcuts
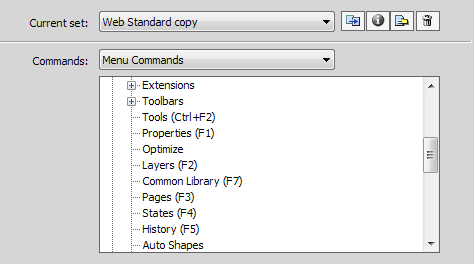
You can select “Photoshop” shortcuts from the “Current set”, but if you are anything like me you have a lot of shortcuts remapped to easy use with one hand and a bunch of your own exclusive ones for frequent operations — this option can’t get you covered completely. So transit as much of your PS shortcuts to FW as you can and create new ones as you explore FW.
Few hints:
- There is a useful, in some cases, tool – the
 Select Behind tool that hides under the
  Pointer tool, but since there is no such thing in PS and I’ve selected it by mistake a few times–you may consider removing a hotkey from it or assign a separate one.
 - Same goes for the
 Vector Path tool and the
  Redraw Path tool — those go in pack with the
  Pen tool and we can put them aside for now. I can tell you that working with shapes is way more convenient and advanced in FW, but we will get to it later.
 - There are a lot of cool vector shapes in FW, but we are trying to use stuff that we are already familiar with, so let’s stick with rectangle, round, polygonal and rounded rectangle.

- If you are using “save for web” in PS — map your shortcut for it to file/image preview, it’s a close enough analogue.

 Select Behind tool that hides under the
  Pointer tool, but since there is no such thing in PS and I’ve selected it by mistake a few times–you may consider removing a hotkey from it or assign a separate one.
 Vector Path tool and the
  Redraw Path tool — those go in pack with the
  Pen tool and we can put them aside for now. I can tell you that working with shapes is way more convenient and advanced in FW, but we will get to it later.

Panels

Everybody has own panel arrangement, so pull familiar ones, add Pages, States, and both Libraries. Arrange them the way you’ve used to in PS. Notice the Properties panel on the bottom — it’s the important one, leave it there and map a hotkey to show/hide it so it won’t be in your way in some cases. Now give your layout a name and save it. Btw, if you are on Windows and know how to remove the top panel — let me know. It’s useless for me, now it’s there and I didn’t find a way to hide it properly.
Here is my current PS and FW layout.

GO!
Now open a new document, turn rulers on (they are always in pixels — nice, huh?) and try to sketch something basic. I hope you’ll feel at home. Btw, here is a feature that I never used in PS, but found it in FW — by click and drag from the rulers corner you can move “zero” mark, so that it can be where your bleed ends and actual artwork begins. How cool is that?
What’s next?
Next time we will wireframe using libraries, pages, states and some more FW features that PS-only users can only dream about!
Wireframing
All of the following can be applied to the final graphic design process too, but wireframes are the stuff we usually start with, right?
So, let’s assume that all use cases and stories are sorted out, all paper and whiteboard doodles are done and you are ready to go digital. But first, let me explain why we are going to do it in FW instead of PS.
Why Fireworks is better for UI wireframing?
Photoshop is a photo editing and graphic design tool and was never developed to cover UI designer needs. So, the simple answer is — the Fireworks software is made for it. Basically, there are two main advantages, but those are crucial:
Pages and States
Most of the time your project consists of quite a few different screens (pages) and each screen can have different states depending on the situation. In PS, you can use layer comps for this, but since layer comps are never meant to be used this way, they are far from convenience that FW has to offer.


Libraries
In the wireframing process, you constantly re-use a set of standard interface elements such as boxes, input fields, scroll bars, buttons e.t.c. PS users usually keep a separate file with a set of such bits and pieces, which is not very handy, and there is no way to scale them quickly, which makes wireframing too time-consuming. With FW you don’t need that workaround — it has symbol libraries functionality built-in.


Actually, let’s start from setting one up for you.
Setting up a library
There are several ways to start wireframing using FW libraries:
- Use built in Common Library
- Create your own library using your old PS library file
- Use a 3rd party library
- A combination of any of above
Common Library
 FW has some interface elements that you can use “from the box”. Just open your Common Library tab and browse through the folders and see what you can use in your work and may be delete something that you never will. There are some icons, form elements and other stuff. When you drag an item to your document, it goes to the Document Library where you can modify it to suit your needs. Those changes will apply to all items used in the document.
Creating Custom Library items
If you already have a set of spare parts that you use in PS — why not to make a FW library from them? Do it once and it will enhance your design process dramatically. Here is how:
- Open your PS file in FW:


- Convert element to symbol:


- Give it a name, set properties, save to an appropriate folder:


- Now you can find it in the Common Library:


- Drag it to your document, double click it and define scale area:


- Go back and scale using simple transform. No distortion!


3rd party libraries
You can use libraries created by your colleagues, downloaded for free or bought online. There are 3 types of such libraries:
- Extensions
In the fist case you just install the extension: and that’s it, it’s in your Common Library:
- Converted to symbols
You can import symbols from it to your Document Library: or open it and save symbols to Common Library:
- Not converted to symbols
It’s similar to the one you may used to have in PS and consists of a lot of elements sorted by type using pages or layers. Just convert elements from it to symbols when you insert them to your document.
 and that’s it, it’s in your Common Library:
 or open it and save symbols to Common Library:

Working faster and smarter
OK, now you have your toolbox right, ready to rock and can just follow your usual wireframing routine in a more effective way thanks to the library symbols. Great, but let’s not forget about some more cool FW features:
Styles

The main difference between FW and PS styles is that FW styles can keep font properties. Treat styles as a part of your Document Library and save all typography stuff there. It will save you a lot of time.
Master page

Most of the time, a lot of your screens (if not all of them) will have something in common, like logo design, header, browser frame or mobile phone body e.t.c. Use master page for that kind of things and if, in the end, you decide to change your iPhone body color, browser type or your project will change title — you can save yourself a lot of dull copy-pasting.
Layer sharing

It’s a common case when you should add something to several, but not all screens of your project. FW has the “Share Layer To …” functionality where PS has nothing to offer but wasted time and frustration. Features like this make a huge difference.
Interactivity
Bring some life to your interface by making your prototype interactive. You can add hot-spots to your clickable areas and link to pages in the project:

or create behaviors and swap images in hot-spots or linked slices:

You can better understand how your project would work when you save it as HTML and click it through.
More to come
I hope you found this post useful. Next time I’m going to tell you about some DOs and DON’Ts regarding PS and FW compatibility, must-have extensions and more. Stay tuned!