
One of the most exciting things about Heroku is that you can scale in a single click – just add more dynos, and you can immediately handle higher load. This post is about our experience of hosting high load application on Heroku and situation when adding more dynos does not help.
While throughput of our application was increasing each and every day we started to notice that we have more and more tolerated and frustrated requests. The problem was that it was fast (nothing to optimize) requests, but sometimes processing time for these requests was more 15 sec.
After investigation we found that the reason is Request Queuing Time. If you take a look on queuing time chart, the average is pretty good, but the maximums could be enormous.
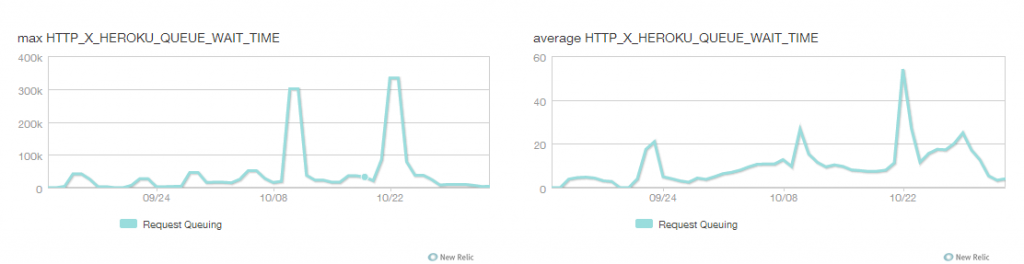
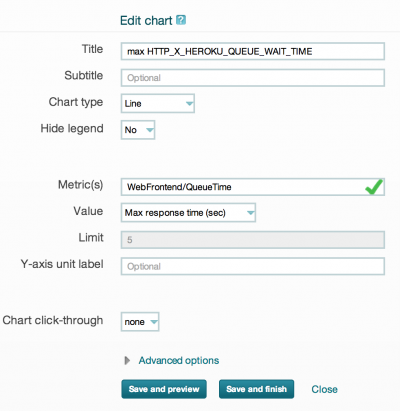
To get the maximums you have to create custom dashboard and add chart for WebFrontend/QueueTime metric.
Why is Queuing Time so huge? Maybe we need more dynos? But adding more dynos doesn’t help.
So, let’s see what is Queuing Time on Heroku, how it works and what we can do.
The cause in Heroku Routing Mesh
Let’s take a look at the Heroku docs to understand queuing time better. When a request reaches Heroku, it’s passed from a load balancer to the “routing mesh”. The routing mesh is a custom Erlang solution based on MochiWeb that routes requests to a specific dyno. Each dyno has its own request queue, and the routing mesh pushes requests to a dyno queue. When dyno is available, it picks up a request from its queue and your application processes it. The time between when routing mesh receives the request and when the dyno picks it up is the queuing time.
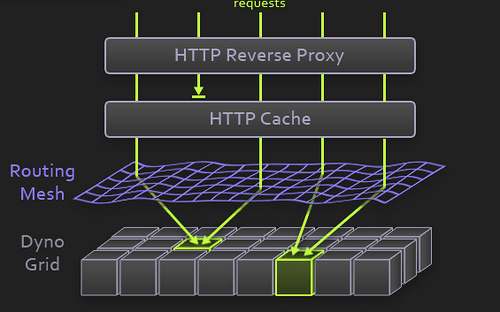
Each request has an X-Heroku-queue-Wait-Time HTTP header with the queuing time value for this particular request. That’s how New Relic knows what to show on its charts. The key point for us in the routing schema is the request distribution. The Heroku docs say:
The routing mesh uses a random selection algorithm for HTTP request load balancing across web processes.
That means that even if a dyno is stuck processing a long-running request, it will still get more requests in its queue. If a dyno serves a 15-second request and is routed another request that ends up taking 100ms, that second request will take 15.1 seconds to complete. That’s why Heroku recommends putting all long-running actions in background jobs.
Possible solutions
These queuing time peaks were a major pain in the neck for us. Under high load (~10-15k requests per minute), a stuck dyno could result in a hundreds of timeouts. Here are some ways to minimize request queuing:
- Drop long-running requests
Heroku recommended one final workaround: drop all long-running requests within our application using Rack::Timeout or, when we switched from Thin to Unicorn, by setting a timeout in Unicorn. - Move long-running actions to background jobs
Long-running requests, like uploading CSVs of contacts or downloading CSVs of contacts can be moved to background jobs - Splitting into multiple applications
Each application was an identical Heroku application that served different types of requests using a unique subdomain. So, for example, you can move database-heavy reports to second app.Problems:- “Single push” deployment became a pain
- Many add-ons we had in our original app (logging, SSL, etc) needed to be added to the new applications
- Had to monitor several New Relic accounts
- Managing multiple applications on Heroku worked in the short run, but was not ideal
Our solution: Slow-Fast Request Balancer
With this solution we got same results like with “Splitting into multiple applications“ but without additional pain. We setup Haproxy balancer which have two queues, one for “slow” and another for “fast” requests. By limiting parallel processing in “slow” queue we always have free workers for “fast” queue.
Do you have this problem?
If you’re running an application under high load on Heroku, you’re almost certainly facing this problem and don’t know about it. New Relic showed that our application performance was very fast (< 100ms) and average queuing time very low even when these problems were at their worst. But check your maximums for Queuing Time with custom dashboard graph!
For most applications, it probably doesn’t matter if a fraction of a percent of your requests take a long time. But sometimes we can’t afford to have any requests that take more than a couple seconds, even if our average response time is well under 100ms.
Conclusion
Each of possible solutions resulted in fewer timeouts. But the best solution which helps us get fast results is solution with Haproxy Balancer. Next we will describe how we implemented it for Heroku application.
Preface
Previously we discussed application with slow resources and heroku queuing time problems. Today we find out how to setup HAProxy as “slow-fast” request balancer for heroku application using Amazon Elastic Compute Cloud.
You will need:
- non optimized application
- Heroku account
- Amazon EC2 account
Prepare AWS tools
Although you can manage AWS via WEB interface we prefer command line tools.
- Download Amazon EC2 API Tools
- Login to EC2 consle
- Obtain your AWS_ACCESS_KEY and AWS_SECRET_KEY on to Access Credentials page
Now switch to console and setup your credentials for tools.
$ export AWS_ACCESS_KEY=your_AWS_ACCESS_KEY_ID
$ export AWS_SECRET_KEY=your_AWS_SECRET_KEY
Check access by invoking (for example):
$ ec2-describe-instances
Tools are ready.
Create balancer ssh access key
In order to access balancer we need ssh private key.
Choose name for your key (e.g. haproxy-balancer) and create it by:
$ ec2-add-keypair haproxy-balancer
KEYPAIR haproxy-balancer 0a:ea:f9:f6:4c:29:80:33:0c:2e:af:7b:8c:dc:5c:5b:24:65:53:6f
-----BEGIN RSA PRIVATE KEY-----
...
-----END RSA PRIVATE KEY-----
Save output to some file e.g haproxy-balancer.pem. Don’t forget to set right permissions:
$ chmod 600 haproxy-balancer.pem
Configure Firewall
Open to ports in order to access our instances via SSH and HTTP:
$ ec2-authorize default -P tcp -p 22
$ ec2-authorize default -P tcp -p 80
Note. From security point of view we recommend to create special access group for balancer instead of using default group.
Setup balancer on AWS
AMI
We are going to use standard latest Ubuntu AMI. On alestic page choose desired ubuntu version.
Be sure to choose AMI from us-east-1 region because heroku instances are located exactly in this region,
otherwise you will have network latency.
On moment of writing this article latest AMI is:
Ubuntu 12.10 Quantal EBS boot ami-7539b41c
Run instance using haproxy-balancer credentials into us-east-1 region on t1.micro instance:
$ ec2-run-instances ami-7539b41c -k haproxy-balancer -t t1.micro --region us-east-1
In order to find out status and IP of instance wait a while and run:
$ ec2-describe-instances i-99de1ce8
HAProxy
Connect to balancer instance:
$ ssh -i haproxy-balancer.pem ubuntu@ec2-174-129-156-71.compute-1.amazonaws.com
Install HAProxy package:
ubuntu@ip-10-112-71-4:~$ sudo apt-get install haproxy
(Optionally) Install git package:
ubuntu@ip-10-112-71-4:~$ sudo apt-get install git
Clone our HAProxy request balancer configuration.
You are free to use own HAProxy configuration just follow ideas in our configuration.
Anyway we strongly recommend you to keep your configuration under control version system (git. subversion, etc).
And then deliver changes to server from SCM repository instead of editing it directly on the server.
For simplity we clone sample configuration and change it on the server:
ubuntu@ip-10-112-71-4:~$ sudo mv /etc/haproxy/ haproxy.origin
ubuntu@ip-10-112-71-4:~$ sudo git clone git://github.com/railsware/haproxy-slow-fast-request-balancer.git /etc/haproxy
Tune slow urls in:
/etc/haproxy/patterns/*
Enable HAProxy by setting ENABLED=1 into /etc/default/haproxy:
ubuntu@ip-10-112-71-4:~$ sudo vim /etc/default/haproxy
Start HAProxy:
ubuntu@ip-10-112-71-4:~$ sudo vim /etc/init.d/haproxy start
Check HAProxy:
http://stats:qwerty@ec2-174-129-156-71.compute-1.amazonaws.com/haproxystats
Switch to HAProxy balancer
Now we can try visit slow/fast urls of our application using balancer IP address or perform some load/stress testing.
When everything is ok we are ready to change application DNS host settings to balancer IP.
We recommend to allocate and assign elastic IP for this purporse. It allows you easy switch to another balancer if something goes wrong.
Allocate new IP addresss:
$ ec2-allocate-address
$ ADDRESS 54.235.201.228 standard
Assign address to your Balancer IP address:
$ ec2-associate-address 54.235.201.228 -i i-99de1ce8
ADDRESS 54.235.201.228 i-99de1ce8
Check again by visiting your application via assigned elastic IP.
Finally change your DNS “A” record of to balancer IP according your DNS provider manual.
Also Heroku Custom Domains article can be useful.
Rollback
If something went wrong switch back DNS settings to use heroku application directly.
Conclusion
As we already mentioned this solution is “temporary”. It gives your application opportunity to survive under high traffic.
You may use “slow-fast” balancer until you fix your slow resources by moving them to background or changing your architecture.
Then you may switch back to direct application usage.
We are hope you find this article helpful.