
Hello my dear friends. Today we will talk about a Chef Server. In this article we will learn what is the Chef Server and how to setup it up. Before reading this article, it’s better to read my articles about Chef Solo. Here I’ll explain only those things that hasn’t already been covered in those Chef Solo series of articles.
What is the Chef Server?
Chef is a Ruby-based configuration management engine.
The Chef Server acts as a hub, ensuring that the right cookbooks are used, that the right policies are applied, that all of the node objects are up-to-date, and that all of the nodes that will be maintained are registered and known to the Chef Server. The Chef Server distributes configuration details (such as recipes, templates, and file distributions) to every node within the organization. Chef then does as much of the configuration work as possible on the nodes themselves (and not on the Chef Server). This scalable approach distributes the configuration effort throughout the organization.
There are three types of Chef Servers:
- Hosted Chef is a version of a Chef Server that is hosted by Opscode. Hosted Chef is cloud-based, scalable, and available (24×7/365), with resource-based access control. Hosted Chef has all of the automation capabilities of Chef, but without requiring it to be set up and managed from behind the firewall.
- Private Chef is a version of a Chef Server that is designed to provide all of the infrastructure automation capabilities of Chef, set up and managed from within the organization.
- Open Source Chef is an open source version of the Chef Server that contains much of the same functionality as Hosted Chef, but requires that each instance be configured and managed locally, including performing data migrations, applying updates to the Open Source Chef server, and ensuring that the Open Source Chef server scales as the local infrastructure it is supporting grows. Open Source Chef includes support from the Chef community but does not include support directly from Opscode.
In the series of articles we will work with Open Source Chef.
What is the difference between Chef Solo and Chef Server?
Chef Solo does not provide:
- Node data storage or search indexes.
- Centralized cookbook distribution.
- Environments, for setting policy of cookbook versions.
- A central API to interact with and use to integrate infrastructure components.
- Bulk operations with nodes.
As you can see, Chef Solo is useful for small infrastructure (several servers), but if you have a huge amount of server – you must use Chef Server.
Environments
As you remember, Chef Solo has nodes, roles and data bags. Chef Server have additional policy: environments. An environment is a way to map an organization’s real-life workflow to what can be configured and managed when using Chef Server. Every Chef organization begins with a single environment called the “_default” environment, which cannot be modified (or deleted). Additional environments can be created, such as production, staging, testing, and development. Generally, an environment is also associated with one (or more) cookbook versions. An environment attribute can only be set to be a default attribute or an override attribute.
Attributes for recipes can be redefined in this way (except “override attributes”):
Defaults (lowest precedence) -> Environments -> Roles -> Nodes (highest precedence)
Chef version
In this series of articles we will work with Chef 11. You can read about changes in this Chef version by this link.
Initialize Chef Server project
To setup and configure Chef Server we will use Chef Solo (really? :). This is because this component of the system also should be quickly deployed to the new server, if something happened with Chef Server something happens (crash file system of server, etc.). Do not forget to make a backups of Chef Server (because compared with Chef Solo, Chef Server will be the point of failure in your configuration management system).
Let’s create our folder, which will contain all our Chef kitchen:
$ mkdir chef-server-example
$ cd chef-server-example
Next I will use bundler to get some useful gems:
$ cat Gemfile
  source :rubygems
  #
  # gem 'chef', "~> 11.4.0"
  # need version 11.4.0, but problem with net-ssh versions conflict
  # install it manual by "gem install" command
  #
  gem 'knife-solo'
  gem 'berkshelf', github: "RiotGames/berkshelf", branch: "fix-for-chef-11"
  gem 'ffi', '~> 1.2.0'
  gem 'vagrant'
  gem 'oj'
  gem 'multi_json'

$ bundle
And create a kitchen for the Chef:
$ knife solo init .
Berkshelf
As you remember, we used librarian gem to manage cookbooks for Chef Solo we used librarian gem. For this tutorial, I selected another good gem to manage a cookbooks dependencies – berkshelf. You can use anyone you like, but compared to the “librarian” the “berkshelf” has several pros:
- By default, berkshelf stores every version of a cookbook that you have ever installed in one folder on your local machine (the same workflow as for rubybems)
- Flexible configuring
- Build-in integration with Vagrant and Thor
- Adding sources of cookbooks to groups (like have bundler)
Let’s create the Berksfile file and add the “chef-server” cookbook “chef-server” cookbook (this cookbook supported by Opscode):
Let’s create the Berksfile file and add the “chef-server” cookbook to it (this cookbook supported by Opscode):
$ cat Berksfile
#!/usr/bin/env ruby
#^syntax detection

site :opscode

cookbook 'chef-server',
  git: 'git://github.com/opscode-cookbooks/chef-server.git'

$ berks install
After launch of command “berks install” your cookbooks directory will be clear, because by default “berkshelf” install cookbooks into “~/.berkshelf” location. You can easily install your Cookbooks and their dependencies to a location other than default by argument “–path”:
After the launch of the “berks install” command, your cookbooks directory will be clear, because, by default, “berkshelf” installs cookbooks into “~/.berkshelf” location. You can easily install your Cookbooks and their dependencies to a location other than the default by the argument “–path” argument:
$ berks install --path cookbooks
But right now we don’t need this.
Configure Chef Server node
After this, we should configure the Chef Solo node for our Chef Server. I will do this by using a role. First of all, we should create “chef.json” in the role folder with content:
{
  "name": "chef",
  "chef_type": "role",
  "json_class": "Chef::Role",
  "description": "The base role for Chef Server",
  "default_attributes": {
    "chef-server": {
      "version": "latest",
      "configuration": {
        "chef_server_webui": {
          "enable": true
        }
      }
    }
  },
  "run_list": [
    "recipe[chef-server::default]"
  ]
}
By the “configuration” key you can change settings for Chef Server. All available settings, which is possible to redefined, you can find here.
Next, we should create the “vagrant.json” node with the following content:
{
  "run_list": [
    "role[chef]"
  ]
}
We are ready for testing this Chef Server kitchen.
Vagrant
For testing Chef Server by vagrant, we need to download the vagrant box. List of boxes you can find at www.vagrantbox.es.
$ vagrant box add precise64 http://dl.dropbox.com/u/1537815/precise64.box
$ vagrant init precise64
Next, we need to model a cluster of machines by vagrant. Let’s modify the Vagrantfile:
require 'rubygems'
require 'bundler'

Bundler.require
require 'multi_json'
require 'berkshelf/vagrant'

host_cache_path = File.expand_path("../.cache", __FILE__)
guest_cache_path = "/tmp/vagrant-cache"

# ensure the cache path exists
FileUtils.mkdir(host_cache_path) unless File.exist?(host_cache_path)

Vagrant::Config.run do |config|

  config.vm.define :chef do |chef_config|
    config.vm.customize ["modifyvm", :id, "--cpus", 2]
    config.vm.customize ["modifyvm", :id, "--memory", 1024]

    chef_config.vm.box = "precise64"
    chef_config.vm.network :hostonly, "10.33.33.33"
    chef_config.vm.share_folder "cache", guest_cache_path, host_cache_path

    chef_config.ssh.max_tries = 40
    chef_config.ssh.timeout   = 120

    chef_config.berkshelf.berksfile_path = Pathname(__FILE__).dirname.join('Berksfile')

    VAGRANT_JSON = MultiJson.load(Pathname(__FILE__).dirname.join('nodes', 'vagrant.json').read)

    chef_config.vm.provision :chef_solo do |chef|
       chef.cookbooks_path = ["site-cookbooks", "cookbooks"]
       chef.roles_path = "roles"
       chef.data_bags_path = "data_bags"
       chef.provisioning_path = guest_cache_path

       chef.json = VAGRANT_JSON
       VAGRANT_JSON['run_list'].each do |recipe|
        chef.add_recipe(recipe)
       end if VAGRANT_JSON['run_list']

       Dir.glob(Pathname(__FILE__).dirname.join('roles', '*.json')).each do |role|
        chef.add_role(Pathname.new(role).basename(".*").to_s)
       end
    end
  end

  config.vm.define :chef_client do |chef_client_config|
    chef_client_config.vm.box = "precise64"
    chef_client_config.vm.network :hostonly, "10.33.33.50"

    chef_client_config.ssh.max_tries = 40
    chef_client_config.ssh.timeout   = 120
  end
end
We set two nodes: chef (Chef Server) and chef\_client (client of Chef Server). We use the “hostonly” network for these servers. In this case, both of these servers will be available by IPs: 10.33.33.33 and 10.33.33.50. Also, there’s no need to forward ports because services on these servers can be available by this IPs. To find more, read “Multi-VM Environments” and “Chef Solo Provisioning” you can find by this links.
Let’s create our nodes:
$ vagrant up
/Users/leo/.rvm/gems/ruby-1.9.3-p385/gems/hashie-2.0.0/lib/hashie/mash.rb:80: warning: redefining `object_id' may cause serious problems
[chef] Importing base box 'precise64'...

...

[Berkshelf] installing cookbooks...
[Berkshelf] Installing chef-server (2.0.0) from git: 'git://github.com/opscode-cookbooks/chef-server.git' with branch: 'a3b94e30b599f901eee2eb1af5bc1f4ef011cae4'

...

[chef] Running chef-solo...
stdin: is not a tty
[Sat, 16 Feb 2013 12:09:03 +0000] INFO: *** Chef 0.10.10 ***
[Sat, 16 Feb 2013 12:09:03 +0000] INFO: Setting the run_list to ["role[chef]"] from JSON
[Sat, 16 Feb 2013 12:09:03 +0000] INFO: Run List is [role[chef]]
[Sat, 16 Feb 2013 12:09:03 +0000] INFO: Run List expands to [chef-server::default]
[Sat, 16 Feb 2013 12:09:03 +0000] INFO: Starting Chef Run for precise64
[Sat, 16 Feb 2013 12:09:03 +0000] INFO: Running start handlers
[Sat, 16 Feb 2013 12:09:03 +0000] INFO: Start handlers complete.
[Sat, 16 Feb 2013 12:09:03 +0000] INFO: Omnitruck download-server request: http://www.opscode.com/chef/download-server?p=ubuntu&pv=12.04&m=x86_64&v=latest&prerelease=false&nightlies=false

...

[Sat, 16 Feb 2013 12:17:59 +0000] INFO: Chef Run complete in 536.107466 seconds
[Sat, 16 Feb 2013 12:17:59 +0000] INFO: Running report handlers
[Sat, 16 Feb 2013 12:17:59 +0000] INFO: Report handlers complete
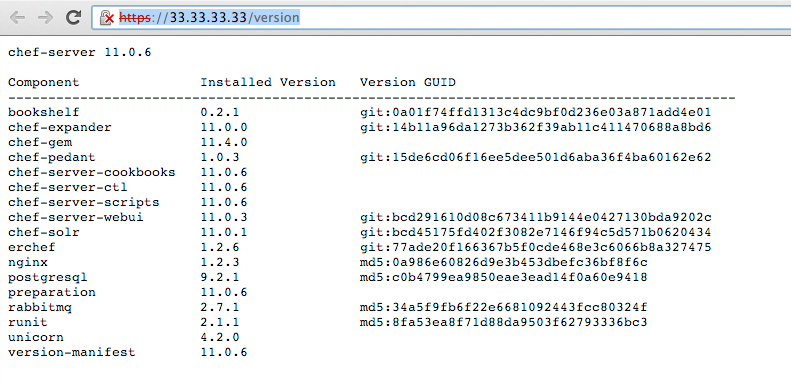
Our Chef Server by default takes your systems FQDN as Chef Server url. We can check Chef Server web interface by “https://10.33.33.33” and info about versions by “https://10.33.33.33/version” url. It should looks like this:
After login by “admin/p@ssw0rd1” you must change admin password to some secure password.
SSH keys
After installation Chef Server with default settings, Chef will generate pem keys, which will be used for knife (command line tool for Chef) and Chef clients for authentication with the server. We should copy them from our Chef Server to “.chef” directory in the project:
$ vagrant ssh chef
Welcome to Ubuntu 12.04.1 LTS (GNU/Linux 3.2.0-23-generic x86_64)

 * Documentation:  https://help.ubuntu.com/
Welcome to your Vagrant-built virtual machine.
Last login: Mon Aug 20 19:28:45 2012 from 10.0.2.2
vagrant@precise64:~$ sudo cp /etc/chef-server/*.pem /vagrant/.chef/
On prodution you can use scp command for this.
Knife configuration
Next we should create for knife configuration file (knife should know how to communicate with Chef Server):
$ knife configure -i
WARNING: No knife configuration file found
Where should I put the config file? [/Users/leo/.chef/knife.rb] .chef/knife.rb
Please enter the chef server URL: [http://macbookproleo:4000] https://10.33.33.33
Please enter a clientname for the new client: [leo] admin
Please enter the existing admin clientname: [chef-webui]
Please enter the location of the existing admin client's private key: [/etc/chef/webui.pem] .chef/webui.pem
Please enter the validation clientname: [chef-validator]
Please enter the location of the validation key: [/etc/chef/validation.pem] .chef/validation.pem
Please enter the path to a chef repository (or leave blank):
Creating initial API user...
If you have such error:
ERROR: knife encountered an unexpected error
This may be a bug in the 'configure' knife command or plugin
Please collect the output of this command with the `-VV` option before filing a bug report.
Exception: NoMethodError: undefined method `save' for #<Hash:0x007fa8fe123668>
This mean, what you are using chef version 11.0.0. This bug fixed in version 11.4.0.
As a result, you should have a file “.chef/knife.rb” with similar content:
log_level                :info
log_location             STDOUT
node_name                'admin'
client_key               '/Users/leo/programs/projects/chef-server-example/.chef/admin.pem'
validation_client_name   'chef-validator'
validation_key           '/Users/leo/programs/projects/chef-server-example/.chef/validation.pem'
chef_server_url          'https://10.33.33.33'
syntax_check_cache_path  '/Users/leo/programs/projects/chef-server-example/.chef/syntax_check_cache'
Let’s check knife configuration:
$ knife client list
chef-validator
chef-webui
If you see an error on command “knife client list” – check you knife configuration, you pem keys and availability of Chef server.
Bootstrap first node
Once the Chef Server workstation is configured, it can be used to install Chef on one (or more) nodes across the organization using a Knife bootstrap operation. The “knife bootstrap” command is used to SSH into the target machine, and then do what is needed to allow the chef-client to run on the node. It will install the chef-client executable (if necessary), generate keys, and register the node with the Chef Server. The bootstrap operation requires the IP address or FQDN of the target system, the SSH credentials (username, password or identity file) for an account that has root access to the node, and (if the operating system is not Ubuntu, which is the default distribution used by knife bootstrap) the operating system running on the target system.
So let’s do this:
$ knife bootstrap 10.33.33.50 -x vagrant -P vagrant --sudo
Bootstrapping Chef on 10.33.33.50
10.33.33.50 --2013-02-16 16:08:36--  http://opscode.com/chef/install.sh
10.33.33.50 Resolving opscode.com (opscode.com)...
10.33.33.50 184.106.28.82
10.33.33.50 Connecting to opscode.com (opscode.com)|184.106.28.82|:80...
10.33.33.50 connected.

...

10.33.33.50 Starting Chef Client, version 11.0.0
10.33.33.50 Creating a new client identity for precise64 using the validator key.
10.33.33.50 resolving cookbooks for run list: []
10.33.33.50 Synchronizing Cookbooks:
10.33.33.50 Compiling Cookbooks...
10.33.33.50 [2013-02-16T16:09:13+00:00] WARN: Node precise64 has an empty run list.
10.33.33.50 Converging 0 resources
10.33.33.50 Chef Client finished, 0 resources updated
Let’s check clients on Chef Server:
$ knife client list
chef-validator
chef-webui
precise64
As you can see we get a new client “precise64”.
$ knife client show precise64
admin:      false
chef_type:  client
json_class: Chef::ApiClient
name:
public_key:
You can also see this client in Chef Server web interface:
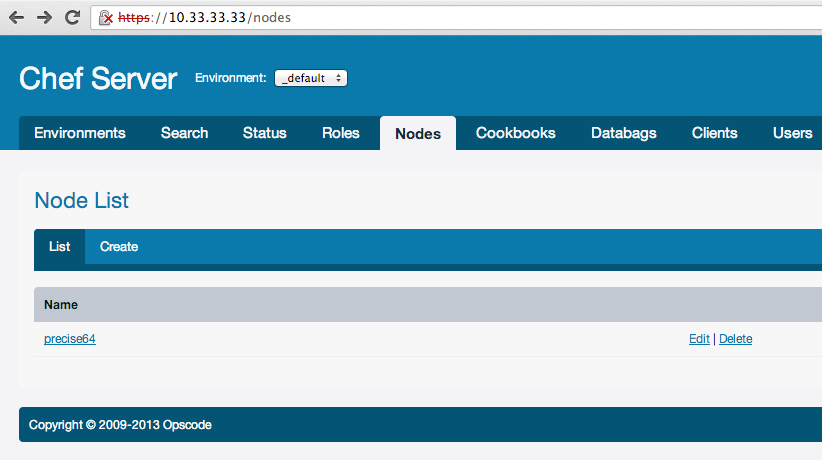
And new registered node:
$ knife node list
precise64

Chef Solo. Part 2
Previously we’ve learned Chef, Chef Server and its setup process. Now we’ll figure out how to work with it.
Directory .chef
In the Part 1 article we set up chef server and added one node (server) to it. For an authentication with chef server we use ssh keys; and for knife we have a configuration in knife.rb. All this stuff should be in “.chef” directory. Here’s our modified knife.rb file (fixed paths for keys):
log_level                :info
log_location             STDOUT
node_name                'admin'
client_key               File.expand_path('../admin.pem', __FILE__)
validation_client_name   'chef-validator'
validation_key           File.expand_path('../chef-validator.pem', __FILE__)
chef_server_url          'http://10.33.33.33'
syntax_check_cache_path  'syntax_check_cache'
cookbook_path            [ './cookbooks', './site-cookbooks' ]
When a node runs the chef-client for the first time, it does not yet have an API client identity, and therefore can’t send authenticated requests to the server. This is where the validation client — known as the chef-validator — comes in. When the chef-client runs, it checks if it has a “client_key”; and if the client key does not exist, it tries to borrow the chef-validator identity to register itself with the server (“validation_key”).
Attribute Precedence
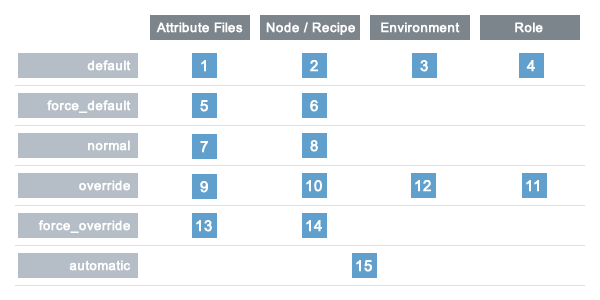
Attributes are always applied by the chef-client in the following order:
- A default attribute located in an attribute file
- A default attribute located in a recipe
- A default attribute located in an environment
- A default attribute located in role
- A force_default attribute located in an attribute file
- A force_default attribute located in a recipe
- A normal attribute located in an attribute file
- A normal attribute located in a recipe
- An override attribute located in an attribute file
- An override attribute located in a recipe
- An override attribute located in a role
- An override attribute located in an environment
- A force_override attribute located in an attribute file
- A force_override attribute located in a recipe
- An automatic attribute identified by Ohai at the start of the chef-client run
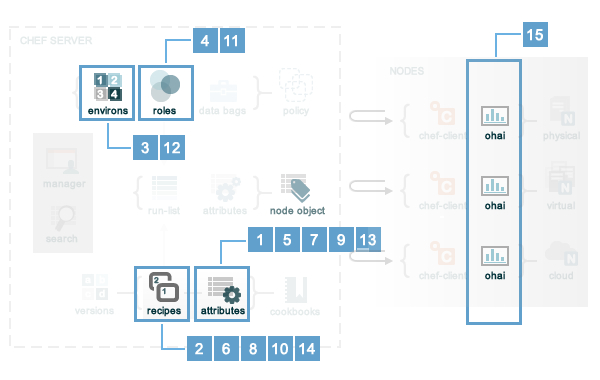
Attribute precedence in the form of an overview diagram, where the numbers in the diagram match the order of attribute precedence:
Power of Environments
Environment is a way to map an organisation’s real-life workflow on what can be configured and managed when using server. Every organisation begins with a single environment – a so called _default environment – which cannot be modified (or deleted). Additional environments can be created to reflect each organisation’s patterns and workflow. Creating production, staging, testing, and development environments is a good example. An environment can be also associated with one (or more) cookbook versions.
A per-environment run-list is a run-list that is associated with a role and a specific environment. There’s more than one environment that can be specified in a role, but each specific environment may be associated with only one run-list. If a run-list is not specified, the default run-list will be used. For example:
{
  "name": "webserver",
  "default_attributes": {
  },
  "json_class": "Chef::Role",
  "env_run_lists": {
    "production": [],
    "preprod": [],
    "test": [ "role[base]", "recipe[apache]" "recipe[apache::copy_test_configs]" ],
    "dev": [ "role[base]", "recipe[apache]", "recipe[apache::copy_dev_configs]" ]
    },
  "run_list": [ "role[base]", "recipe[apache]" ],
  "description": "The webserver role",
  "chef_type": "role",
  "override_attributes": {
  }
}
where:
- “webserver” is the name of the role
- “env_run_lists” is a hash of per-environment run-lists for production, preprod, test, and dev
- “production” and “preprod” use the default run-list because they do not have a per-environment run-list
- “run_list” defines the default run-list
Chef Server And SSL Self-Signed Certificate
As you might recall from the previous article, Chef is by default working on https protocol only (security!). This can be a problem however, if you don’t want to buy a valid ssl certificate for your chef server, because each command to chef server by knife will give you error with invalid ssl. The most simple solution – disable https and work only on http. For this lets modify our chef.js on role:
{
  "name": "chef",
  "chef_type": "role",
  "json_class": "Chef::Role",
  "description": "The base role for Chef Server",
  "default_attributes": {
    "chef-server": {
      "api_fqdn": "10.33.33.33",
      "configuration": {
        "chef-server-webui": {
          "enable": true,
          "web_ui_admin_user_name": "admin",
          "web_ui_admin_default_password": "password"
        },
        "nginx": {
          "url": "http://10.33.33.33",
          "enable_non_ssl": true
        },
        "bookshelf": {
          "url": "http://10.33.33.33"
        }
      }
    }
  },
  "run_list": [
    "recipe[chef-server]"
  ]
}
I’ve added sections “nginx” which allows us to work with Chef server by http protocol and “bookshelf” which should write url to chef server without https. If we leave https, bookshelf will be available only by https.
Cookbooks, roles and nodes on chef server
If compared with Chef Solo, Chef Server stores all the information on server and uses only this information for “cooking” nodes. Therefore, we should know how to upload our roles, cookbooks and nodes on server. First of all, we should install vender cookbooks locally by Berkshelf:
$ berks install --path cookbooks
Installing chef-server (2.0.0) from git: 'git://github.com/opscode-cookbooks/chef-server.git' with branch: '18d6e951a2daa1154b7e82c8909bb7245e57ec1b'
Let’s add python chef cookbook to Berkshelf and run this command again:
$ berks install --path cookbooks
Installing chef-server (2.0.0) from git: 'git://github.com/opscode-cookbooks/chef-server.git' with branch: '18d6e951a2daa1154b7e82c8909bb7245e57ec1b'
Installing python (1.4.1) from git: 'git@github.com:opscode-cookbooks/python.git' with branch: 'f932b3649683b58f7b0fb06a8b43eab2c6f24486'
Using build-essential (1.3.4)
Using yum (2.1.0)
As you can see, dependencies downloaded automatically. Right now we have these cookbooks only in our local directory “cookbooks”. Let’s upload it to Chef Server. For this task we can use knife:
$ knife cookbook upload --all --cookbook-path cookbooks
Uploading build-essential [1.3.4]
Uploading chef-server  [2.0.0]
Uploading python       [1.4.1]
Uploading yum          [2.1.0]
Uploaded all cookbooks.

$ knife cookbook upload --all --cookbook-path site-cookbooks # don't forget about own custom cookbooks in 'site-cookbooks' folder
or we can use Berkshelf:
$ berks upload
Installing chef-server (2.0.0) from git: 'git://github.com/opscode-cookbooks/chef-server.git' with branch: 'master' at ref: '18d6e951a2daa1154b7e82c8909bb7245e57ec1b'
Installing python (1.4.1) from git: 'git@github.com:opscode-cookbooks/python.git' with branch: 'master' at ref: 'f932b3649683b58f7b0fb06a8b43eab2c6f24486'
Using build-essential (1.3.4)
Using yum (2.1.0)
Uploading chef-server (2.0.0) to: 'http://10.33.33.33:80/'
Uploading python (1.4.1) to: 'http://10.33.33.33:80/'
Uploading build-essential (1.3.4) to: 'http://10.33.33.33:80/'
Uploading yum (2.1.0) to: 'http://10.33.33.33:80/'
If you’re actively developing a cookbook, sometimes you might not want to change version with every little fix. Chef server, however, will not allow uploading same versions of cookbook by default:
$ knife cookbook upload --all --cookbook-path cookbooks
Uploading build-essential [1.3.4]
Uploading chef-server    [2.0.0]
Uploading python         [1.4.1]
Uploading yum            [2.1.0]
ERROR: Version 1.3.4 of cookbook build-essential is frozen. Use --force to override.
WARNING: Not updating version constraints for some cookbooks in the environment as the cookbook is frozen.
Uploaded all cookbooks.
Apparently, we can force update cookbooks by option ”–force”:
$ knife cookbook upload --all --force --cookbook-path cookbooks
Uploading build-essential [1.3.4]
Uploading chef-server    [2.0.0]
Uploading python         [1.4.1]
Uploading yum            [2.1.0]
Uploaded all cookbooks.
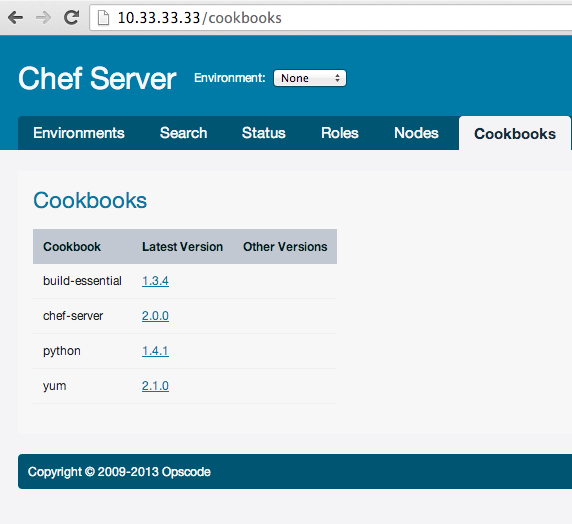
All your cookbooks can be viewed in the web interface (if you enable it):
Then, we want to upload or update roles on server. It’s also easy:
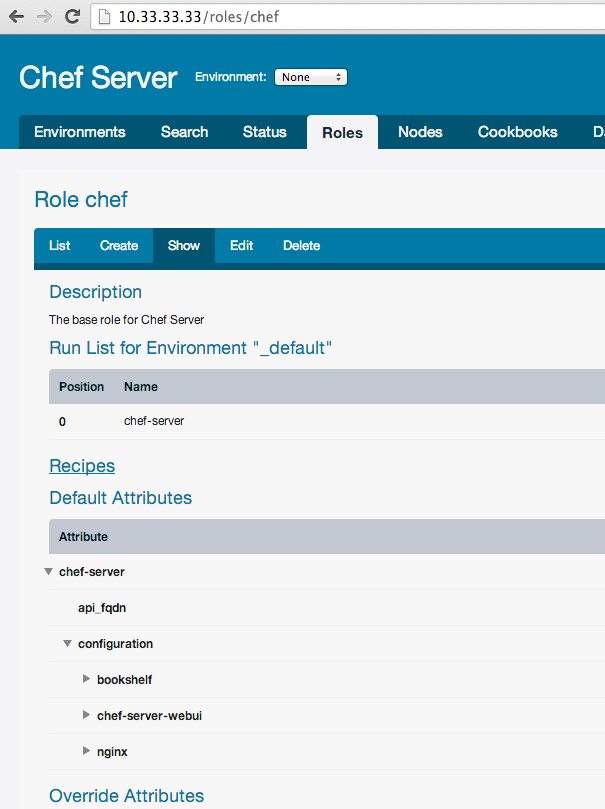
$ knife role from file roles/*.json
Updated Role chef!
This is a role in the web interface:
Almost same commands for environment upload or update:
$ knife environment from file environments/*.json
Updated Environment staging!
Updated Environment production!
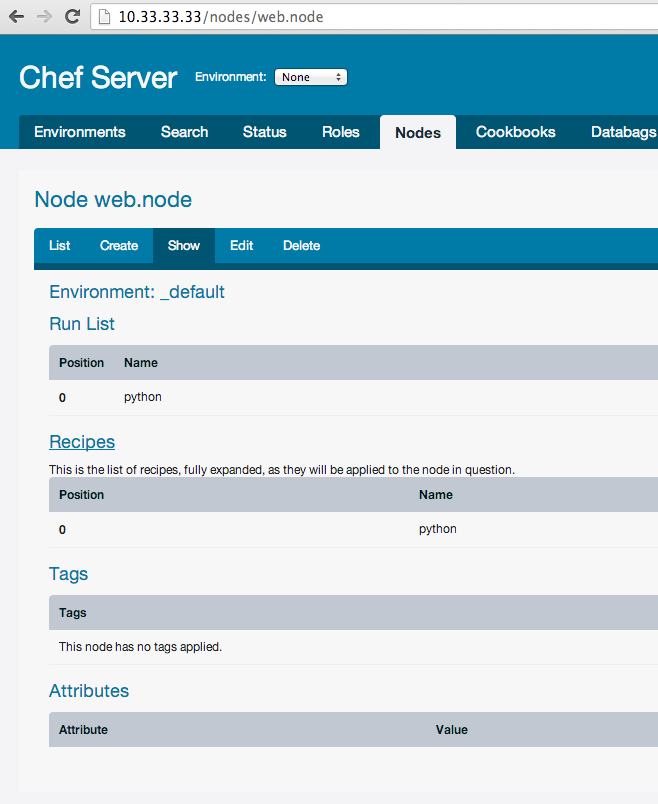
or nodes:
$ knife node from file nodes/*.json
Updated nodes/web.node.json
You can also upload everything using “upload” command:
$ knife upload nodes
Created nodes/vagrant.json
Updated nodes/web.node.json
Just don’t forget to do this. It is also a good point to save current nodes, environments and roles in git (hg, svn, etc.) repo, because if you somehow lose chef server, all cookbooks and recipes will be saved.
Cooking of the nodes
Let’s now cook our node “web.dev”. We will install on it python. So let’s add to “web.node” run list:
{
  "chef_type": "node",
  "json_class": "Chef::Node",
  "run_list": [
    "recipe[python]"
  ]
}
And update web.node on chef server:
$ knife upload nodes
Created nodes/vagrant.json
Updated nodes/web.node.json
By default, chef client on nodes will not execute your run_list, but you can execute any command on nodes by command “ssh”. For example, run chef client on all nodes:
$ knife ssh 'name:*' 'sudo chef-client'
For this command you can use ssh options:
$ knife ssh "name:*" "sudo chef-client" -x vagrant -a 10.33.33.50
The ‘name:*’ is query, ‘sudo chef-client’ which we must execute on nodes found by this query. For example, show uptime only nodes with role web:
$ knife ssh "role:web" "uptime" -x vagrant
To upgrade all nodes:
$ knife ssh "name:*" "sudo aptitude upgrade -y"
Sometimes, however, you may want to update you servers automatically. For example, you’ve just updated new cookbooks, roles and nodes, and all nodes should automatically fetch new cookbooks and execute it, if it’s updated (and for you not critical update speed). We can use special cookbook “chef-client”. It allows using bluepill, daemontools, runit or cron to configure your systems to run Chef Client as a service. Example of attributes for nodes:
{
  "name": "chef-client",
  "chef_type": "role",
  "json_class": "Chef::Role",
  "default_attributes": {
    "chef_client": {
      "interval": 1800,
      "init_style": "upstart",
      "config": {
        "client_fork": true
      }
    }
  },
  "description": "The base role for systems that have chef client",
  "run_list": [
    "recipe[chef-client]",
    "recipe[chef-client::config]"
  ]
}
So, you can add this role for each node. It will check chef server for updates each 1800 sec (30 min).
Chef Solo. Part 3
We continue talking about Chef Solo. All the example codes mentioned here, you can find at: github.com/le0pard/chef-solo-example/tree/5.0.
Previously we’ve learned about Chef cookbooks. Below we will learn what is Ohai and how to write an Ohai plugin.
Ohai
Ohai detects data about your operating system. It can be used standalone, but its primary purpose is to provide node data to Chef.
When invoked, it collects detailed, extensible information about the machine it’s running on, including Chef configuration, hostname, FQDN, networking, memory, CPU, platform, and kernel data.
When Chef configures the node object during each Chef run, these attributes are used by the chef-client to ensure that certain properties remain unchanged. These properties are also referred to as automatic attributes. In our case (in Chef Solo), these attributes are available in the node object. For example:
node['platform'] # The platform on which a node is running. This attribute helps determine which providers will be used.
node['platform_version']  # The version of the platform. This attribute helps determine which providers will be used.
node['hostname']  # The host name for the node.
Ohai plugin
In our cookbook “tomatoes” we already have the node.js recipe. Let’s create the ohai plugin, which will provide us with information about node.js that is already installed in the system node.js. We will use this information to check if we need to install node.js on the server.
First of all, you need create new recipe “ohai_plugin.rb” in “tomatoes” with the following content:
template "#{node['ohai']['plugin_path']}/system_node_js.rb" do
  source "plugins/system_node_js.rb.erb"
  owner "root"
  group "root"
  mode 00755
  variables(
    :node_js_bin => "#{node['nodejs']['dir']}/bin/node"
  )
end

include_recipe "ohai"
This recipe will generate the ohai plugin from template “system\_node\_js.rb”. Next, we should create the following template in the folder “tomatoes/templates/default/plugins”:
provides "system_node_js"
provides "system_node_js/version"

system_node_js Mash.new unless system_node_js
system_node_js[:version] = nil unless system_node_js[:version]

status, stdout, stderr = run_command(:no_status_check => true, :command => "<%= @node_js_bin %> --version")

system_node_js[:version] = stdout[1..-1] if 0 == status
In the first two lines we set automatic attributes by method “provides”, which will provide us with this plugin.
Most of the information we want to lookup would be nested in some way, and ohai tends to do this by storing the data in a Mash. This can be done by creating a new mash and setting the attribute to it. We did this with “system\_node\_js”.
In the end of code, plugin sets the version of node.js, if node.js is installed on the server. That’s it!
Next, let’s try this plugin by adding the following content to the “default.rb” recipe:
include_recipe "tomatoes::ohai_plugin"
# remove this in your prod recipe
puts "Node version: #{node.system_node_js.version}" if node['system_node_js']
Now test it by running the command “vagrant provision”. When you start it for the first time, you will not see anything, as the plugin will be delivered later when the chef-client launched. But the second time, you should see a picture similar to the one below in the log:
[Sat, 26 Jan 2013 18:42:16 +0000] INFO: ohai plugins will be at: /etc/chef/ohai_plugins
[Sat, 26 Jan 2013 18:42:16 +0000] INFO: Processing remote_directory[/etc/chef/ohai_plugins] action create (ohai::default line 27)
[Sat, 26 Jan 2013 18:42:16 +0000] INFO: Processing cookbook_file[/etc/chef/ohai_plugins/README] action create (dynamically defined)
[Sat, 26 Jan 2013 18:42:16 +0000] INFO: Processing ohai[custom_plugins] action reload (ohai::default line 42)
[Sat, 26 Jan 2013 18:42:16 +0000] INFO: ohai[custom_plugins] reloaded
Node version: 0.8.6
[Sat, 26 Jan 2013 18:42:17 +0000] INFO: Processing ohai[reload_nginx] action nothing (nginx::ohai_plugin line 22)
[Sat, 26 Jan 2013 18:42:17 +0000] INFO: Processing template[/etc/chef/ohai_plugins/nginx.rb] action create (nginx::ohai_plugin line 27)
[Sat, 26 Jan 2013 18:42:17 +0000] INFO: Processing remote_directory[/etc/chef/ohai_plugins] action nothing (ohai::default line 27)
[Sat, 26 Jan 2013 18:42:17 +0000] INFO: Processing ohai[custom_plugins] action nothing (ohai::default line 42)
In this case we can change our node.js recipe a little:
execute "nodejs make install" do
  environment({"PATH" => "/usr/local/bin:/usr/bin:/bin:$PATH"})
  command "make install"
  cwd "/usr/local/src/node-v#{node['nodejs']['version']}"
  not_if {node['system_node_js'] && node['system_node_js']['version'] == node['nodejs']['version'] }
end
Let’s try to change the node.js version in the role “web.json”:
"nodejs": {
  "version": "0.8.18",
  "checksum": "e3bc9b64f60f76a32b7d9b35bf86b5d1b8166717"
}
And restart “vagrant provision”:
[Sat, 26 Jan 2013 19:09:32 +0000] INFO: Processing remote_file[/usr/local/src/node-v0.8.18.tar.gz] action create_if_missing (tomatoes::node_js line 16)
[Sat, 26 Jan 2013 19:10:17 +0000] INFO: remote_file[/usr/local/src/node-v0.8.18.tar.gz] updated
[Sat, 26 Jan 2013 19:10:17 +0000] INFO: remote_file[/usr/local/src/node-v0.8.18.tar.gz] mode changed to 644
[Sat, 26 Jan 2013 19:10:17 +0000] INFO: Processing execute[tar --no-same-owner -zxf node-v0.8.18.tar.gz] action run (tomatoes::node_js line 25)
[Sat, 26 Jan 2013 19:10:18 +0000] INFO: execute[tar --no-same-owner -zxf node-v0.8.18.tar.gz] ran successfully
[Sat, 26 Jan 2013 19:10:18 +0000] INFO: Processing bash[compile node.js] action run (tomatoes::node_js line 30)
[Sat, 26 Jan 2013 19:18:16 +0000] INFO: bash[compile node.js] ran successfully
[Sat, 26 Jan 2013 19:18:16 +0000] INFO: Processing execute[nodejs make install] action run (tomatoes::node_js line 40)
[Sat, 26 Jan 2013 19:18:19 +0000] INFO: execute[nodejs make install] ran successfully
And after some time, the server will have a new node.js:
$ vagrant ssh
Welcome to Ubuntu 12.04.1 LTS (GNU/Linux 3.2.0-23-generic x86_64)

 * Documentation:  https://help.ubuntu.com/
Welcome to your Vagrant-built virtual machine.
Last login: Sat Jan 26 19:19:00 2013 from 10.0.2.2
vagrant@precise64:~$ node -v
v0.8.18
And on the next launch of chef solo you should see the new version of node.js:
[Sat, 26 Jan 2013 19:20:22 +0000] INFO: Processing remote_directory[/etc/chef/ohai_plugins] action create (ohai::default line 27)
[Sat, 26 Jan 2013 19:20:22 +0000] INFO: Processing cookbook_file[/etc/chef/ohai_plugins/README] action create (dynamically defined)
[Sat, 26 Jan 2013 19:20:22 +0000] INFO: Processing ohai[custom_plugins] action reload (ohai::default line 42)
[Sat, 26 Jan 2013 19:20:22 +0000] INFO: ohai[custom_plugins] reloaded
Node version: 0.8.18
[Sat, 26 Jan 2013 19:20:23 +0000] INFO: Processing ohai[reload_nginx] action nothing (nginx::ohai_plugin line 22)
[Sat, 26 Jan 2013 19:20:23 +0000] INFO: Processing template[/etc/chef/ohai_plugins/nginx.rb] action create (nginx::ohai_plugin line 27)
Summary
We have learned what Chef Server is and how to setup it up. We have also learned about Ohai and how to write an Ohai plugin. I haven’t covered many things related to Chef server with this article (i.e.advanced usage, knife-ec2, opsworks – based on chef solo, etc.), but I this should be enough to start working with it.
You can find all the code examples here:
- github.com/le0pard/chef-server-example/tree/1.0
- github.com/le0pard/chef-server-example/tree/2.0
- github.com/le0pard/chef-solo-example/tree/5.0
This post is crossposting from my blog.