If you are reading this blog post, you are probably working on a Google add-on in Google Apps Script. In this article, I want to share the specific domain knowledge our Railsware development team has gained, as well as the best practices we applied when building the Coupler.io Google Sheets add-on.
At early stages Coupler.io was a Google Sheets add-on used to automate the data import process from Airtable to Google spreadsheets. At some point in time users started complaining about API instability, low speed of work and unstable background sync. It is worth mentioning that back then the product was available on the G Suite Marketplace for free. After analyzing the support tickets, we saw clearly that Airtable users were ready to pay for a more stable version, which pushed us to basically rethink the strategy for this product.Therefore, below I will focus on the problems we faced and solutions we discovered while improving the add-on stability and integrating the ChargeBee payment system. In any case, this article will also be useful for those who want to learn Google Apps Script.
There is no event in the Google Apps Script API that would allow you to find out from the sidebar what an active sheet is.So, if you want to display the relevant information in the spreadsheet sidebar based on a current active sheet – you have to write a callback function explicitly to do that job.First of all, write the following function in the back end:
function getCurrentSheetId(){
  return SpreadsheetApp.getActiveSheet().getSheetId();
}
Then call that function explicitly from the Google Apps Script UI side using a helper function:var currentSheetId = null;
function onCurrentSheetChange(callback){
google.script.run
.withSuccessHandler(function(sheetId){
if(currentSheetId !== sheetId){
currentSheetId = sheetId;
callback(sheetId);
}
setTimeout(onCurrentSheetChange.bind(null, callback), 100); // time in milliseconds to wait
})
.withFailureHandler(function() {
setTimeout(onCurrentSheetChange.bind(null, callback), 100); // Still continue calling even if error happens
}).getCurrentSheetId();
}
The only way to know that the active sheet has been changed is to monitor the add-on’s back end for some period of time (for example, 100ms). Of course, you will experience some delay between the time when a user changes the sheet and the time when a callback runs. In our case, the delay was about 0.5s. After you understand the code written above, all you have to do is to add this small piece of code:onCurrentSheetChange(function(sheetId){
// Do whatever you want
});
Note: in the majority of cases you will get the following message in the browser console:Net state changed from IDLE to BUSY Net state changed from BUSY to IDLEIt is just a notification about the state of the connection to the add-on’s back end. So, if you use the above-mentioned method to be notified once a new sheet opens – you will keep seeing these messages. You can check a question related to this topic on StackOverflow as well.
2. Coding Google Apps Script in your lovely IDE locally
There is a way to develop your Google Apps Script locally instead of using the online Google Apps Script editor. You can use the tool called clasp for this purpose, which will save your time by helping you structure the code.You can develop your add-on locally in any IDE you want and by one simple command synchronize it with Google Apps Script.- Develop Locally: clasp enables the development of Apps Script projects locally. Developers can check in their code into source control, cooperate with other devs and use favorite tools.
- Manage Deployment Versions: Create, update, and view multiple deployments of your project.
- Structure Code: clasp automatically converts your flat project on script.google.com into folders. For example:
- On script.google.com:
- tests/slides.gs
- tests/sheets.gs
- locally:
- tests/
- slides.js
- sheets.js
- On script.google.com:
- Write Apps Script in TypeScript
3. Google Apps Script HTML service structure. External assets.
Surely, you would like to use some external JS/CSS libraries in the add-on’s sidebar, such as different analytics and material design libraries, or trite jQuery.I wouldn’t suggest you to use many JS/CSS libraries because they may increase sidebar loading time. If you prefer using jQuery, I would recommend changing it with nanoJS. It will work great in most cases if you are building an add-on with simple behavior. Moreover, it’s 7 times smaller in size than jQuery.The same approach applies to the material design library. Even though Google propagates its usage, I would recommend trying a cool alternative called Materialize, which has the same concept, is simple to integrate and has a much smaller size.Remember that if you open MsgBox (a native modal window of the add-on API) – it will have no style by default, but you will be able to include everything you need in the Google Apps Script dialog box, as well as in the sidebar UI. As a result, I would suggest splitting your project into different files: at least keep the Google Apps Script HTML, JS, and CSS separately. This is how you can add assets to MsgBox and sidebar UI without duplication.Below you may see how our manifest file looks:<!--?!= include('sidebar/assets/css'); ?-->
<!-- Google Apps Script HTML service example that defines the sidebar element structure. -->
<div class="sidebar"><!--?!= include('sidebar/partials/current_sheet'); ?-->
<!--?!= includeIf('sidebar/partials/dev', ADDON_ENV() !== 'production'); ?-->
</div>
<!--?!= include('sidebar/assets/external.js'); ?-->
<!--?!= include('sidebar/assets/helpers.js'); ?-->
<!--?!= include('sidebar/assets/js'); ?-->
And here are the helper functions located in the add-on’s back end:function include(filename) {
return HtmlService.createTemplateFromFile(filename).evaluate().getContent();
}
function includeIf(filename, condition){
if(condition){
return include(filename);
} else {
return '';
}
}
Calling .evaluate() in the .include() function allows you to use syntax in files that you included in manifest.Please bear in mind that you cannot use plain .css or .js files. What you can use are files with a .html extension that you have to put code inside the specific HTML tag.For instance, here is how sidebar/assets/js.html will look:<script type="text/javascript"> // Your js magic goes here </script>And, finally, below is the function of evaluating the index.html (manifest file) into sidebar:
function onOpen(_event) {
    var sidebar = HtmlService.createTemplateFromFile("sidebar/index").evaluate().setTitle("Google Apps Script sidebar");
    SpreadsheetApp.getUi().showSidebar(sidebar);
}
4. Staging environment and environment variables
Some Google Apps Script features, like time-based triggers, are hard to test in the development environment (“Test as add-on…” mode), when you just open the script in one of your files.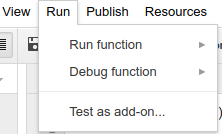 Pic. 1. Using “Test as add-on…” modeBefore you publish the Script as a web add-on for anyone to use (public access), you can deploy it privately. In order to do this, you need to have your own custom Google Suite and create a copy of your add-on Script (to have a separate “scriptld”), then click “Publish” => “Deploy as web add-on…” in your script console. After filling in the required fields, you will be redirected to an admin’s web store page of the add-on.Note: You need to create a copy of the add-on in order for the Google store to treat it as a separate app. Using clasp locally, as described earlier, you can work on only one project, but still, have the ability to move it either to the production or staging environment (a copy of your add-on).At the bottom of the page, you will have the list of visibility options to choose from: “Public”, “Unlisted” or “Private”. The “Public” checkbox will be enabled by default.
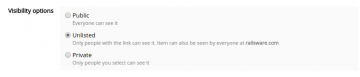 Pic. 2. Visibility options of Google Apps Script add-onAfter starting to use the staging environment, it would be good to introduce some environmental variables that will help distinguish the environment itself from the one within the add-on. It would be helpful, for example, to add additional functionality to the staging environment for developers to be able to test some specific features.To return certain environment, you can either use a custom function in the back end called ADDON_ENV() or dig deeper and use .env file. It will allow you to automate the process of pushing source to different projects with different source ID by using a webpacker or similar tool.
5. Google Apps Script Triggers
Triggers frequency
Using time-based triggers in an add-on is similar to a cron task that runs by rules set up for it. You can schedule the times when you want the triggers to run. You may configure them to run infinitely with a certain frequency. However, you cannot set up a trigger with a time interval of less than one hour. In other words, the maximum frequency is once per hour.The only way one can make a Google Apps Script trigger run every minute is by configuring it manually in the development environment. To do this, go to https://script.google.com, open the add-on you want to add a trigger to, click “Edit” => “Current project’s triggers”. You will be able to see the list of all your public functions. Here you can manage your triggers and give them a one-minute frequency. This is the only way that you can test triggers locally.Development restrictions
Are you familiar with this kind of error message?“The Add-on attempted an action that is not permitted in Test as Add-on mode. To use this action, you must deploy the Add-on.”It appears when you try to run a trigger in the development environment. Google does not allow that. The only way to accomplish this is to write a wrapper to create a Google Apps Script trigger like this one:function ticTac(){
// do whatever you want
}
function createHourlyTrigger(){
if(ADDON_ENV() !== 'development'){
return ScriptApp.newTrigger('ticTac').timeBased().everyHours(1).create();
}
}
What do these functions do? You will not be able to create a trigger if your add-on is in the development environment, meaning that it is not deployed yet. If you are testing a trigger in the development environment, just follow the steps described above and create a manual Google Apps Script trigger by setting up any frequency you want. And for the development environment, you can create the same trigger for function ticTac() as was described above.Limitations
There are certain quotas and limitations that Apps Script services impose on triggers. You can learn more about them in this Quotas for Google Services document. As you can see, one can create up to 20 triggers per user, not more. So, you should be careful not to exceed this limit. In addition, each trigger cannot run for more than 6 minutes. Otherwise, you will get a timeout error. This problem and one of the solutions were already described in our previous blog post. In this blog post, I wanted to cover another aspect of this problem and show how you can avoid reaching 20 triggers per user. If your add-on does not require triggers to run some long-term tasks that may reach a limit of 6 minutes, you can do all your work inside one trigger. Just create that trigger in an onOpen() callback and that’s it.Here is a Google Apps Script trigger example for this case:function onOpen(event) {
initHourlyTrigger();
// another stuff you want to do
}
function ticTac(){
// Things you want to run hourly just put here
var currentDate = new Date();
if(currentDate.getHours() === 0){ /* do whatever you want once a day */ };
if(currentDate.getHours() % 3 === 0){ /* run each 3 hours */ };
}
function initHourlyTrigger(){
return getHourlyTrigger() || createHourlyTrigger()
}
function getHourlyTrigger(){
return getTriggerByName_('ticTac');
}
function createHourlyTrigger(){
if(ADDON_ENV() !== 'development'){
return ScriptApp.newTrigger('ticTac').timeBased().everyHours(1).create();
}
}
function getTriggerByName_(name){
var trigger = null;
var ss = SpreadsheetApp.getActiveSpreadsheet();
ScriptApp.getUserTriggers(ss).forEach(function(t) {
if (t.getHandlerFunction() === name) trigger = t;
});
return trigger
}
How to rename an already running trigger
While I followed the approach described above, I faced another problem. It is not crucial, but I would still like to mention it in this post. What if you want to give the current trigger a new name? There is one small advantage of using the “one trigger” approach: one can change the function in which a trigger works on. Please note that you don’t have to rename the function directly.See the solution below:function ticTac(){
// you can call new function as well or you have just left this function blank for backwards compatibility
newFunctionInsteadOfTicTac();
}
function newFunctionInsteadOfTicTac(){
// put your code here
}
function getHourlyTrigger(){
return getTriggerByName_('newFunctionInsteadOfTicTac');
}
function createHourlyTrigger(){
// delete old one import trigger for backwards compatibility
deleteTriggerByName('ticTac');
if(ADDON_ENV() !== 'development'){
return ScriptApp.newTrigger('newFunctionInsteadOfTicTac').timeBased().everyHours(1).create();
}
}
function deleteTriggerByName(name){
var trigger = getTriggerByName_(name);
if (trigger) ScriptApp.deleteTrigger(trigger);
}
After deploying your code to production, the old function in the trigger will be successfully replaced with a new one.While developing the add-on, we faced another problem related to creating menu items dynamically. In our case, we had to create one submenu item per sheet that would be connected to Airtable by our add-on. A click on a certain menu item should trigger re-import of all the data from a remote Airtable view. The problem was that the Google Apps Script API did not allow us to create menu items dynamically.Here is how the function looks (Google Apps Script Class Menu document):
function onOpen(event) {
    var ui = SpreadsheetApp.getUi();
    var menu = ui.createAddonMenu();
    menu.addItem("Open sidebar", "onOpenSidebar");
    menu.addToUi();
}

function onOpenSidebar() {
  console.log("Sidebar opened!");
}
The function addItem() requires two string arguments. The first argument is a menu item label, and the second one – is the name of the function that is being called by an onclick event represented as a string as well. It becomes obvious that you cannot pass arguments at all. Only the function name. Of course, you can go through all your Google Apps Script sheets and create menu items dynamically which would include the labels and function names you need. As a result, you will be able to create menu items with dynamic function names. But what about dynamic functions themselves?So, the solution is pretty tricky:function onOpen(event) {
var ui = SpreadsheetApp.getUi();
var menu = ui.createAddonMenu();
menu.addItem("Open sidebar", "onOpenSidebar");
if (event && event.authMode === ScriptApp.AuthMode.NONE) {
// There is no ability to either fetch cache or get imported sheets for not authorized user (not enabled add-on).
// Not enough Google Apps Script Permissions.
} else {
var sheetsMenu = ui.createMenu("Re-Import sheet");
getImportedSheets().forEach(function(sheet){
sheetsMenu.addItem(sheet.getName(), 'reImportSpreadsheet_' + sheet.getSheetId());
});
menu.addSubMenu(sheetsMenu);
}
menu.addToUi();
}
// global scope function to assign parametrized functions for imported sheets submenu
(function (globalScope) {
var importedSheetIds = getImportedSheetIds();
if (importedSheetIds.length !== 0) {
importedSheetIds.forEach(function(sheetId){
createMenuFunction(sheetId);
});
}
function createMenuFunction(sheetId) {
globalScope['reImportSpreadsheet_' + sheetId] = function() {
reImportSpreadsheet_(sheetId);
}
}
})(this);
function reImportSpreadsheet_(sheetId) {
// Exactly callback for user click on certain menu item
}
As you can see we are doing manipulation with the global scope of the add-on. That’s why you need to be careful because a piece of code like this one(function (globalScope) {
console.log('global scope');
})(this);
… may spam logs infinitely when your add-on is running. So, if you open StackDriver you will be able to see the output of Google Apps Script logger every 0.5 or 1 second as follows: Pic. 3. Google Apps Script Stack Driver logs outputSo, be careful when experimenting with the global scope. When you are working with it, don’t forget about Google Apps Script’s limitations. For example, do not get properties right from the global scope because you have a limit of about 50K get/write properties per day. This limit is quite reasonable, but it still can be reached. You can try using cache services which will help you avoid exceeding the Google Apps Script quotas.The above example confirms that there is no such concept as Google Apps Script script global variables or even constants. All you have to do is to create a function like this:
function constants(){
    return {
        dailyQuotaLimit: 10,
        // and so on
    }
}
… and call it whenever you want. So, this function can serve as a store for all your constants without the need to call properties.7. Google Apps Script Quotas and limitations
Before you start coding an add-on, I would recommend taking a look at Google’s document about Quotas for Google Services. It is also good to know that there is no Google Apps Script API that can provide you with information about already used quotas. However, you can find a way to track an increase in the sheet’s cell value. If you still choose to use Properties Service, you will be able to write more data to one property key as a stringified JSON instead of just using one value per key. This approach will save you a lot of get/set property calls. Note that you can push up to 9KB of data into one property. Here is the link to a related topic on StackOverflow. Have a look at what we have done to store all data of a user’s Google Apps Script sheets into one property key:// will return JSON as well
function getStoredData(sheet) {
sheet = sheet || SpreadsheetApp.getActiveSheet();
var value = documentProps().getProperty(sheet.getSheetId());
try {
// return blank JSON by default
return JSON.parse(value) || {};
} catch (e) {
return defaultData_();
}
}
function setStoredData(sheet, data) {
var value = jsonStringify_(data);
documentProps().setProperty(sheet.getSheetId(), value);
return data;
}
function updateStoredData(sheet, props) {
var data = getStoredData(sheet);
for (var key in props) {
data[key] = props[key];
}
setStoredData(sheet, data);
return data;
}
function deleteStoredData(sheet) {
var sheet = sheet || SpreadsheetApp.getActiveSheet();
documentProps().deleteProperty(sheet.getSheetId());
}
function documentProps() {
return PropertiesService.getDocumentProperties();
}
function jsonStringify_(obj) {
return JSON.stringify(obj, Object.keys(obj || {}).sort());
}
So, as you can see in the example above, you can simply put a certain JSON instead of a string into one property.8. Google Add-on Payment Integration
At the moment, Google does not provide options for add-ons to charge users yet. However, it allows vendors to integrate one of the existing payment systems or build their own for this purpose.Here is what Google says about charging add-on users in the Develop Add-ons for Google Sheets, Docs, Slides, Forms, and Gmail document: Pic. 4. Charging Google add-on usersSo, do not hesitate to integrate the payment system you want. In our case, we have explored a few solutions and opted for ChargeBee. This system provides simple integration and payment/subscription validation, as well as drop-in Google Apps Script UI. In addition, it takes over all payment-related user management for us.
Epilogue: useful tidbits
- Do not hesitate to use the cache service since it can increase the loading speed and save the Google Apps Script quotas like crazy.
- Use private functions that end with an underscore.
- Remember that sheet names are unique. You can’t create 2 sheets with the same name inside one spreadsheet.
- The URL Fetch Service makes requests from the server side, so you should not worry about the CORS.
- There is no notification or a webhook call to let you know that a new version of an add-on was successfully published to production. Show the version number somewhere in the Google Apps Script UI to track version update progress.
- You probably realized that Google Apps Script does not support ES6, pure JS only. In all examples above there were no ES6. But, of course, if you start using clasp you can simply use babel locally to transform all your .js files with ES6 to .gs files processable by Google Apps Script.