

What is a product hypothesis?
A hypothesis is a testable statement that predicts the relationship between two or more variables. In product development, we generate hypotheses to validate assumptions about customer behavior, market needs, or the potential impact of product changes. These experimental efforts help us refine the user experience and get closer to finding a product-market fit.
Product hypotheses are a key element of data-driven product development and decision-making. Testing them enables us to solve problems more efficiently and remove our own biases from the solutions we put forward.
Here’s an example: ‘If we improve the page load speed on our website (variable 1), then we will increase the number of signups by 15% (variable 2).’ So if we improve the page load speed, and the number of signups increases, then our hypothesis has been proven. If the number did not increase significantly (or not at all), then our hypothesis has been disproven.
In general, product managers are constantly creating and testing hypotheses. But in the context of new product development, hypothesis generation/testing occurs during the validation stage, right after idea screening.
Now before we go any further, let’s get one thing straight: What’s the difference between an idea and a hypothesis?
Idea vs hypothesis
Innovation expert Michael Schrage makes this distinction between hypotheses and ideas – unlike an idea, a hypothesis comes with built-in accountability. “But what’s the accountability for a good idea?” Schrage asks. “The fact that a lot of people think it’s a good idea? That’s a popularity contest.” So, not only should a hypothesis be tested, but by its very nature, it can be tested.
At our software agency, we’ve built our product development services on the careful selection, prioritization, and validation of ideas. Here’s how we distinguish between ideas and hypotheses:
Idea: A creative suggestion about how we might exploit a gap in the market, add value to an existing product, or bring attention to our product. Crucially, an idea is just a thought. It can form the basis of a hypothesis but it is not necessarily expected to be proven or disproven.
Examples:
- We should get an interview with the CEO of our company published on TechCrunch.
- Why don’t we redesign our website?
- The Coupler.io team should create video tutorials on how to export data from different apps, and publish them on YouTube.
- Why not add a new ‘email templates’ feature to our Mailtrap product?
Hypothesis: A way of framing an idea or assumption so that it is testable, specific, and aligns with our wider product/team/organizational goals.
Examples:
- If we add a new ‘email templates’ feature to Mailtrap, we’ll see an increase in active usage of our email-sending API.
- Creating relevant video tutorials and uploading them to YouTube will lead to an increase in Coupler.io signups.
- If we publish an interview with our CEO on TechCrunch, 500 people will visit our website and 10 of them will install our product.
Now, it’s worth mentioning that not all hypotheses require testing. Sometimes, the process of creating hypotheses is just an exercise in critical thinking. And the simple act of analyzing your statement tells whether you should run an experiment or not. Remember: testing isn’t mandatory, but your hypotheses should always be inherently testable.
Let’s consider the TechCrunch article example again. In that hypothesis, we expect 500 readers to visit our product website, and a 2% conversion rate of those unique visitors to product users i.e. 10 people. But is that marginal increase worth all the effort? Conducting an interview with our CEO, creating the content, and collaborating with the TechCrunch content team – all of these tasks take time (and money) to execute. And by formulating that hypothesis, we can clearly see that in this case, the drawbacks (efforts) outweigh the benefits. So, no need to test it.
In a similar vein, a hypothesis statement can be a tool to prioritize your activities based on impact. We typically use the following criteria:
- The quality of impact
- The size of the impact
- The probability of impact
This lets us organize our efforts according to their potential outcomes – not the coolness of the idea, its popularity among the team, etc.
Now that we’ve established what a product hypothesis is, let’s discuss how to create one.
Start with a problem statement
Before you jump into product hypothesis generation, we highly recommend formulating a problem statement. This is a short, concise description of the issue you are trying to solve. It helps teams stay on track as they formalize the hypothesis and design the product experiments. It can also be shared with stakeholders to ensure that everyone is on the same page.
The statement can be worded however you like, as long as it’s actionable, specific, and based on data-driven insights or research. It should clearly outline the problem or opportunity you want to address.
Here’s an example: Our bounce rate is high (more than 90%) and we are struggling to convert website visitors into actual users. How might we improve site performance to boost our conversion rate?
How to generate product hypotheses
Now let’s explore some common, everyday scenarios that lead to product hypothesis generation. For our teams here at Railsware, it’s when:
- There’s a problem with an unclear root cause e.g. a sudden drop in one part of the onboarding funnel. We identify these issues by checking our product metrics or reviewing customer complaints.
- We are running ideation sessions on how to reach our goals (increase MRR, increase the number of users invited to an account, etc.)
- We are exploring growth opportunities e.g. changing a pricing plan, making product improvements, breaking into a new market.
- We receive customer feedback. For example, some users have complained about difficulties setting up a workspace within the product. So, we build a hypothesis on how to help them with the setup.
BRIDGES framework for ideation
When we are tackling a complex problem or looking for ways to grow the product, our teams use BRIDGeS – a robust decision-making and ideation framework. BRIDGeS makes our product discovery sessions more efficient. It lets us dive deep into the context of our problem so that we can develop targeted solutions worthy of testing.
Between 2-8 stakeholders take part in a BRIDGeS session. The ideation sessions are usually led by a product manager and can include other subject matter experts such as developers, designers, data analysts, or marketing specialists. You can use a virtual whiteboard such as Figjam or Miro (see our Figma template) to record each colored note.
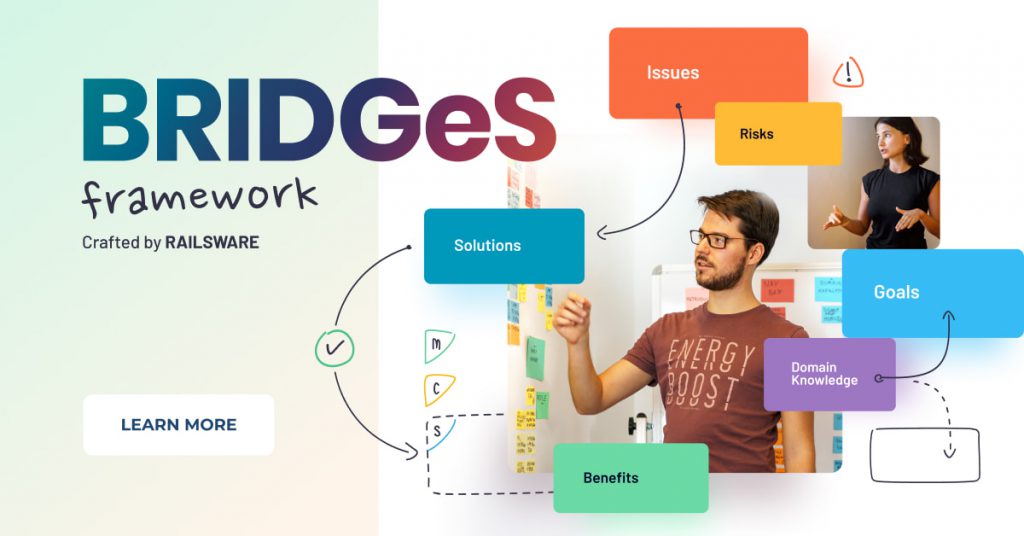
In the first half of a BRIDGeS session, participants examine the Benefits, Risks, Issues, and Goals of their subject in the ‘Problem Space.’ A subject is anything that is being described or dealt with; for instance, Coupler.io’s growth opportunities. Benefits are the value that a future solution can bring, Risks are potential issues they might face, Issues are their existing problems, and Goals are what the subject hopes to gain from the future solution. Each descriptor should have a designated color.
After we have broken down the problem using each of these descriptors, we move into the Solution Space. This is where we develop solution variations based on all of the benefits/risks/issues identified in the Problem Space (see the Uber case study for an in-depth example).
In the Solution Space, we start prioritizing those solutions and deciding which ones are worthy of further exploration outside of the framework – via product hypothesis formulation and testing, for example. At the very least, after the session, we will have a list of epics and nested tasks ready to add to our product roadmap.
How to write a product hypothesis statement
Across organizations, product hypothesis statements might vary in their subject, tone, and precise wording. But some elements never change. As we mentioned earlier, a hypothesis statement must always have two or more variables and a connecting factor.
1. Identify variables
Since these components form the bulk of a hypothesis statement, let’s start with a brief definition.
First of all, variables in a hypothesis statement can be split into two camps: dependent and independent. Without getting too theoretical, we can describe the independent variable as the cause, and the dependent variable as the effect. So in the Mailtrap example we mentioned earlier, the ‘add email templates feature’ is the cause i.e. the element we want to manipulate. Meanwhile, ‘increased usage of email sending API’ is the effect i.e the element we will observe.
Independent variables can be any change you plan to make to your product. For example, tweaking some landing page copy, adding a chatbot to the homepage, or enhancing the search bar filter functionality.
Dependent variables are usually metrics. Here are a few that we often test in product development:
- Number of sign-ups
- Number of purchases
- Activation rate (activation signals differ from product to product)
- Number of specific plans purchased
- Feature usage (API activation, for example)
- Number of active users
Bear in mind that your concept or desired change can be measured with different metrics. Make sure that your variables are well-defined, and be deliberate in how you measure your concepts so that there’s no room for misinterpretation or ambiguity.
For example, in the hypothesis ‘Users drop off because they find it hard to set up a project’ variables are poorly defined. Phrases like ‘drop off’ and ‘hard to set up’ are too vague. A much better way of saying it would be: If project automation rules are pre-defined (email sequence to responsible, scheduled tickets creation), we’ll see a decrease in churn. In this example, it’s clear which dependent variable has been chosen and why.
And remember, when product managers focus on delighting users and building something of value, it’s easier to market and monetize it. That’s why at Railsware, our product hypotheses often focus on how to increase the usage of a feature or product. If users love our product(s) and know how to leverage its benefits, we can spend less time worrying about how to improve conversion rates or actively grow our revenue, and more time enhancing the user experience and nurturing our audience.
2. Make the connection
The relationship between variables should be clear and logical. If it’s not, then it doesn’t matter how well-chosen your variables are – your test results won’t be reliable.
To demonstrate this point, let’s explore a previous example again: page load speed and signups.
Through prior research, you might already know that conversion rates are 3x higher for sites that load in 1 second compared to sites that take 5 seconds to load. Since there appears to be a strong connection between load speed and signups in general, you might want to see if this is also true for your product.
Here are some common pitfalls to avoid when defining the relationship between two or more variables:
Relationship is weak. Let’s say you hypothesize that an increase in website traffic will lead to an increase in sign-ups. This is a weak connection since website visitors aren’t necessarily motivated to use your product; there are more steps involved. A better example is ‘If we change the CTA on the pricing page, then the number of signups will increase.’ This connection is much stronger and more direct.
Relationship is far-fetched. This often happens when one of the variables is founded on a vanity metric. For example, increasing the number of social media subscribers will lead to an increase in sign-ups. However, there’s no particular reason why a social media follower would be interested in using your product. Oftentimes, it’s simply your social media content that appeals to them (and your audience isn’t interested in a product).
Variables are co-dependent. Variables should always be isolated from one another. Let’s say we removed the option “Register with Google” from our app. In this case, we can expect fewer users with Google workspace accounts to register. Obviously, it’s because there’s a direct dependency between variables (no registration with Google→no users with Google workspace accounts).
3. Set validation criteria
First, build some confirmation criteria into your statement. Think in terms of percentages (e.g. increase/decrease by 5%) and choose a relevant product metric to track e.g. activation rate if your hypothesis relates to onboarding. Consider that you don’t always have to hit the bullseye for your hypothesis to be considered valid. Perhaps a 3% increase is just as acceptable as a 5% one. And it still proves that a connection between your variables exists.
Secondly, you should also make sure that your hypothesis statement is realistic. Let’s say you have a hypothesis that ‘If we show users a banner with our new feature, then feature usage will increase by 10%.’ A few questions to ask yourself are: Is 10% a reasonable increase, based on your current feature usage data? Do you have the resources to create the tests (experimenting with multiple variations, distributing on different channels: in-app, emails, blog posts)?
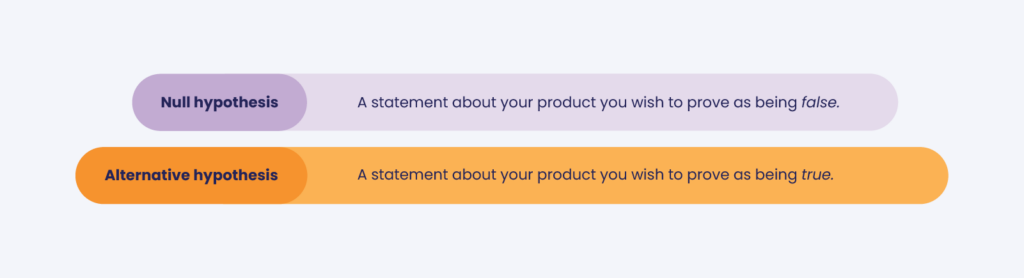
Null hypothesis and alternative hypothesis
In statistical research, there are two ways of stating a hypothesis: null or alternative. But this scientific method has its place in hypothesis-driven development too…
Alternative hypothesis: A statement that you intend to prove as being true by running an experiment and analyzing the results. Hint: it’s the same as the other hypothesis examples we’ve described so far.
Example: If we change the landing page copy, then the number of signups will increase.
Null hypothesis: A statement you want to disprove by running an experiment and analyzing the results. It predicts that your new feature or change to the user experience will not have the desired effect.
Example: The number of signups will not increase if we make a change to the landing page copy.
What’s the point? Well, let’s consider the phrase ‘innocent until proven guilty’ as a version of a null hypothesis. We don’t assume that there is any relationship between the ‘defendant’ and the ‘crime’ until we have proof. So, we run a test, gather data, and analyze our findings — which gives us enough proof to reject the null hypothesis and validate the alternative. All of this helps us to have more confidence in our results.
Now that you have generated your hypotheses, and created statements, it’s time to prepare your list for testing.
Prioritizing hypotheses for testing
Not all hypotheses are created equal. Some will be essential to your immediate goal of growing the product e.g. adding a new data destination for Coupler.io. Others will be based on nice-to-haves or small fixes e.g. updating graphics on the website homepage.
Prioritization helps us focus on the most impactful solutions as we are building a product roadmap or narrowing down the backlog. To determine which hypotheses are the most critical, our software agency uses the MoSCoW framework. It allows us to assign a level of urgency and importance to each product hypothesis so we can filter the best 3-5 for testing.
MoSCoW is an acronym for Must-have, Should-have, Could-have, and Won’t-have. Here’s a breakdown:
- Must-have – hypotheses that must be tested, because they are strongly linked to our immediate project goals.
- Should-have – hypotheses that are closely related to our immediate project goals, but aren’t the top priority.
- Could-have – hypotheses of nice-to-haves that can wait until later for testing.
- Won’t-have – low-priority hypotheses that we may or may not test later on when we have more time.
How to test product hypotheses
Once you have selected a hypothesis, it’s time to test it. This will involve running one or more product experiments in order to check the validity of your claim.
The tricky part is deciding what type of experiment to run, and how many. Ultimately, this all depends on the subject of your hypothesis – whether it’s a simple copy change or a whole new feature. For instance, it’s not necessary to create a clickable prototype for a landing page redesign. In that case, a user-wide update would do.
On that note, here are some of the approaches we take to hypothesis testing at software agency Railsware:
A/B testing
A/B or split testing involves creating two or more different versions of a webpage/feature/functionality and collecting information about how users respond to them. At this stage consider leveraging custom web design to enhance user experience.
Let’s say you wanted to validate a hypothesis about the placement of a search bar on your application homepage. You could design an A/B test that shows two different versions of that search bar’s placement to your users (who have been split equally into two camps: a control group and a variant group). Then, you would choose the best option based on user data. A/B tests are suitable for testing responses to user experience changes, especially if you have more than one solution to test.
Prototyping
When it comes to testing a new product design, prototyping is the method of choice for many Lean startups and organizations. It’s a cost-effective way of collecting feedback from users, fast, and it’s possible to create prototypes of individual features too. You may take this approach to hypothesis testing if you are working on rolling out a significant new change e.g adding a brand-new feature, redesigning some aspect of the user flow, etc. To control costs at this point in the new product development process, choose the right tools — think Figma for clickable walkthroughs or no-code platforms like Bubble.
Deliveroo feature prototype example
Let’s look at how feature prototyping worked for the food delivery app, Deliveroo, when their product team wanted to ‘explore personalized recommendations, better filtering and improved search’ in 2018. To begin, they created a prototype of the customer discovery feature using web design application, Framer.
One of the most important aspects of this feature prototype was that it contained live data — real restaurants, real locations. For test users, this made the hypothetical feature feel more authentic. They were seeing listings and recommendations for real restaurants in their area, which helped immerse them in the user experience, and generate more honest and specific feedback. Deliveroo was then able to implement this feedback in subsequent iterations.
Asking your users
Interviewing customers is an excellent way to validate product hypotheses. It’s a form of qualitative testing that, in our experience, produces better insights than user surveys or general user research. Sessions are typically run by product managers and involve asking in-depth interview questions to one customer at a time. They can be conducted in person or online (through a virtual call center, for instance) and last anywhere between 30 minutes to 1 hour.
Although CustDev interviews may require more effort to execute than other tests (the process of finding participants, devising questions, organizing interviews, and honing interview skills can be time-consuming), it’s still a highly rewarding approach. You can quickly validate assumptions by asking customers about their pain points, concerns, habits, processes they follow, and analyzing how your solution fits into all of that.
Wizard of Oz
The Wizard of Oz approach is suitable for gauging user interest in new features or functionalities. It’s done by creating a prototype of a fake or future feature and monitoring how your customers or test users interact with it.
For example, you might have a hypothesis that your number of active users will increase by 15% if you introduce a new feature. So, you design a new bare-bones page or simple button that invites users to access it. But when they click on the button, a pop-up appears with a message such as ‘coming soon.’
By measuring the frequency of those clicks, you could learn a lot about the demand for this new feature/functionality. However, while these tests can deliver fast results, they carry the risk of backfiring. Some customers may find fake features misleading, making them less likely to engage with your product in the future.
User-wide updates
One of the speediest ways to test your hypothesis is by rolling out an update for all users. It can take less time and effort to set up than other tests (depending on how big of an update it is). But due to the risk involved, you should stick to only performing these kinds of tests on small-scale hypotheses. Our teams only take this approach when we are almost certain that our hypothesis is valid.
For example, we once had an assumption that the name of one of Mailtrap’s entities was the root cause of a low activation rate. Being an active Mailtrap customer meant that you were regularly sending test emails to a place called ‘Demo Inbox.’ We hypothesized that the name was confusing (the word ‘demo’ implied it was not the main inbox) and this was preventing new users from engaging with their accounts. So, we updated the page, changed the name to ‘My Inbox’ and added some ‘to-do’ steps for new users. We saw an increase in our activation rate almost immediately, validating our hypothesis.
Feature flags
Creating feature flags involves only releasing a new feature to a particular subset or small percentage of users. These features come with a built-in kill switch; a piece of code that can be executed or skipped, depending on who’s interacting with your product.
Since you are only showing this new feature to a selected group, feature flags are an especially low-risk method of testing your product hypothesis (compared to Wizard of Oz, for example, where you have much less control). However, they are also a little bit more complex to execute than the others — you will need to have an actual coded product for starters, as well as some technical knowledge, in order to add the modifiers (only when…) to your new coded feature.
. . .
Let’s revisit the landing page copy example again, this time in the context of testing.
So, for the hypothesis ‘If we change the landing page copy, then the number of signups will increase,’ there are several options for experimentation. We could share the copy with a small sample of our users, or even release a user-wide update. But A/B testing is probably the best fit for this task. Depending on our budget and goal, we could test several different pieces of copy, such as:
- The current landing page copy
- Copy that we paid a marketing agency 10 grand for
- Generic copy we wrote ourselves, or removing most of the original copy – just to see how making even a small change might affect our numbers.
Remember, every hypothesis test must have a reasonable endpoint. The exact length of the test will depend on the type of feature/functionality you are testing, the size of your user base, and how much data you need to gather. Just make sure that the experiment running time matches the hypothesis scope. For instance, there is no need to spend 8 weeks experimenting with a piece of landing page copy. That timeline is more appropriate for say, a Wizard of Oz feature.
Recording hypotheses statements and test results
Finally, it’s time to talk about where you will write down and keep track of your hypotheses. Creating a single source of truth will enable you to track all aspects of hypothesis generation and testing with ease.
At our software agency, product managers create a document for each individual hypothesis, using tools such as Coda or Google Sheets. In that document, we record the hypothesis statement, as well as our plans, process, results, screenshots, product metrics, and assumptions.
We share this document with our team and stakeholders, to ensure transparency and invite feedback. It’s also a resource we can refer back to when we are discussing a new hypothesis — a place where we can quickly access information relating to a previous test.
Understanding test results and taking action
The other half of validating product hypotheses involves evaluating data and drawing reasonable conclusions based on what you find. We do so by analyzing our chosen product metric(s) and deciding whether there is enough data available to make a solid decision. If not, we may extend the test’s duration or run another one. Otherwise, we move forward. An experimental feature becomes a real feature, a chatbot gets implemented on the customer support page, and so on.
Something to keep in mind: the integrity of your data is tied to how well the test was executed, so here are a few points to consider when you are testing and analyzing results:
Gather and analyze data carefully. Ensure that your data is clean and up-to-date when running quantitative tests and tracking responses via analytics dashboards. If you are doing customer interviews, make sure to record the meetings (with consent) so that your notes will be as accurate as possible.
Conduct the right amount of product experiments. It can take more than one test to determine whether your hypothesis is valid or invalid. However, don’t waste too much time experimenting in the hopes of getting the result you want. Know when to accept the evidence and move on.
Choose the right audience segment. Don’t cast your net too wide. Be specific about who you want to collect data from prior to running the test. Otherwise, your test results will be misleading and you won’t learn anything new.
Watch out for bias. Avoid confirmation bias at all costs. Don’t make the mistake of including irrelevant data just because it bolsters your results. For example, if you are gathering data about how users are interacting with your product Monday-Friday, don’t include weekend data just because doing so would alter the data and ‘validate’ your hypothesis.
Pro Tips
- Not all failed hypotheses should be treated as losses. Even if you didn’t get the outcome you were hoping for, you may still have improved your product. Let’s say you implemented SSO authentication for premium users, but unfortunately, your free users didn’t end up switching to premium plans. In this case, you still added value to the product by streamlining the login process for paying users.
- Yes, taking a hypothesis-driven approach to product development is important. But remember, you don’t have to test everything. Use common sense first. For example, if your website copy is confusing and doesn’t portray the value of the product, then you should still strive to replace it with better copy – regardless of how this affects your numbers in the short term.
Wrapping Up
The process of generating and validating product hypotheses is actually pretty straightforward once you’ve got the hang of it. All you need is a valid question or problem, a testable statement, and a method of validation. Sure, hypothesis-driven development requires more of a time commitment than just ‘giving it a go.’ But ultimately, it will help you tune the product to the wants and needs of your customers.
If you share our data-driven approach to product development and engineering, check out our services page to learn more about how we work with our clients!